Overview
While Chainlink Data Streams provide access to low-latency market data off-chain, the process of bringing this data on-chain requires significant engineering. Developers must build, deploy, and maintain a custom infrastructure service that can reliably connect to the Data Streams API, implement robust WebSocket reconnection logic, and manage the on-chain transaction logic for when and how to push updates.
The Data Streams Transmitter, a community-led solution, provides a foundational framework for the DevOps teams and Infrastructure Managers tasked with building these systems. Transmitter is a configurable service that handles the core logic of monitoring off-chain Data Streams and pushing values to your smart contracts based on predefined conditions, such as time intervals or price deviations. It also includes a web interface to manage your feeds and monitor their status.
This guide walks you through deploying a DataStreamsFeed consumer contract, setting up the Data Streams Transmitter, and configuring it to monitor a specific Data Stream and relay it to your on-chain contract.
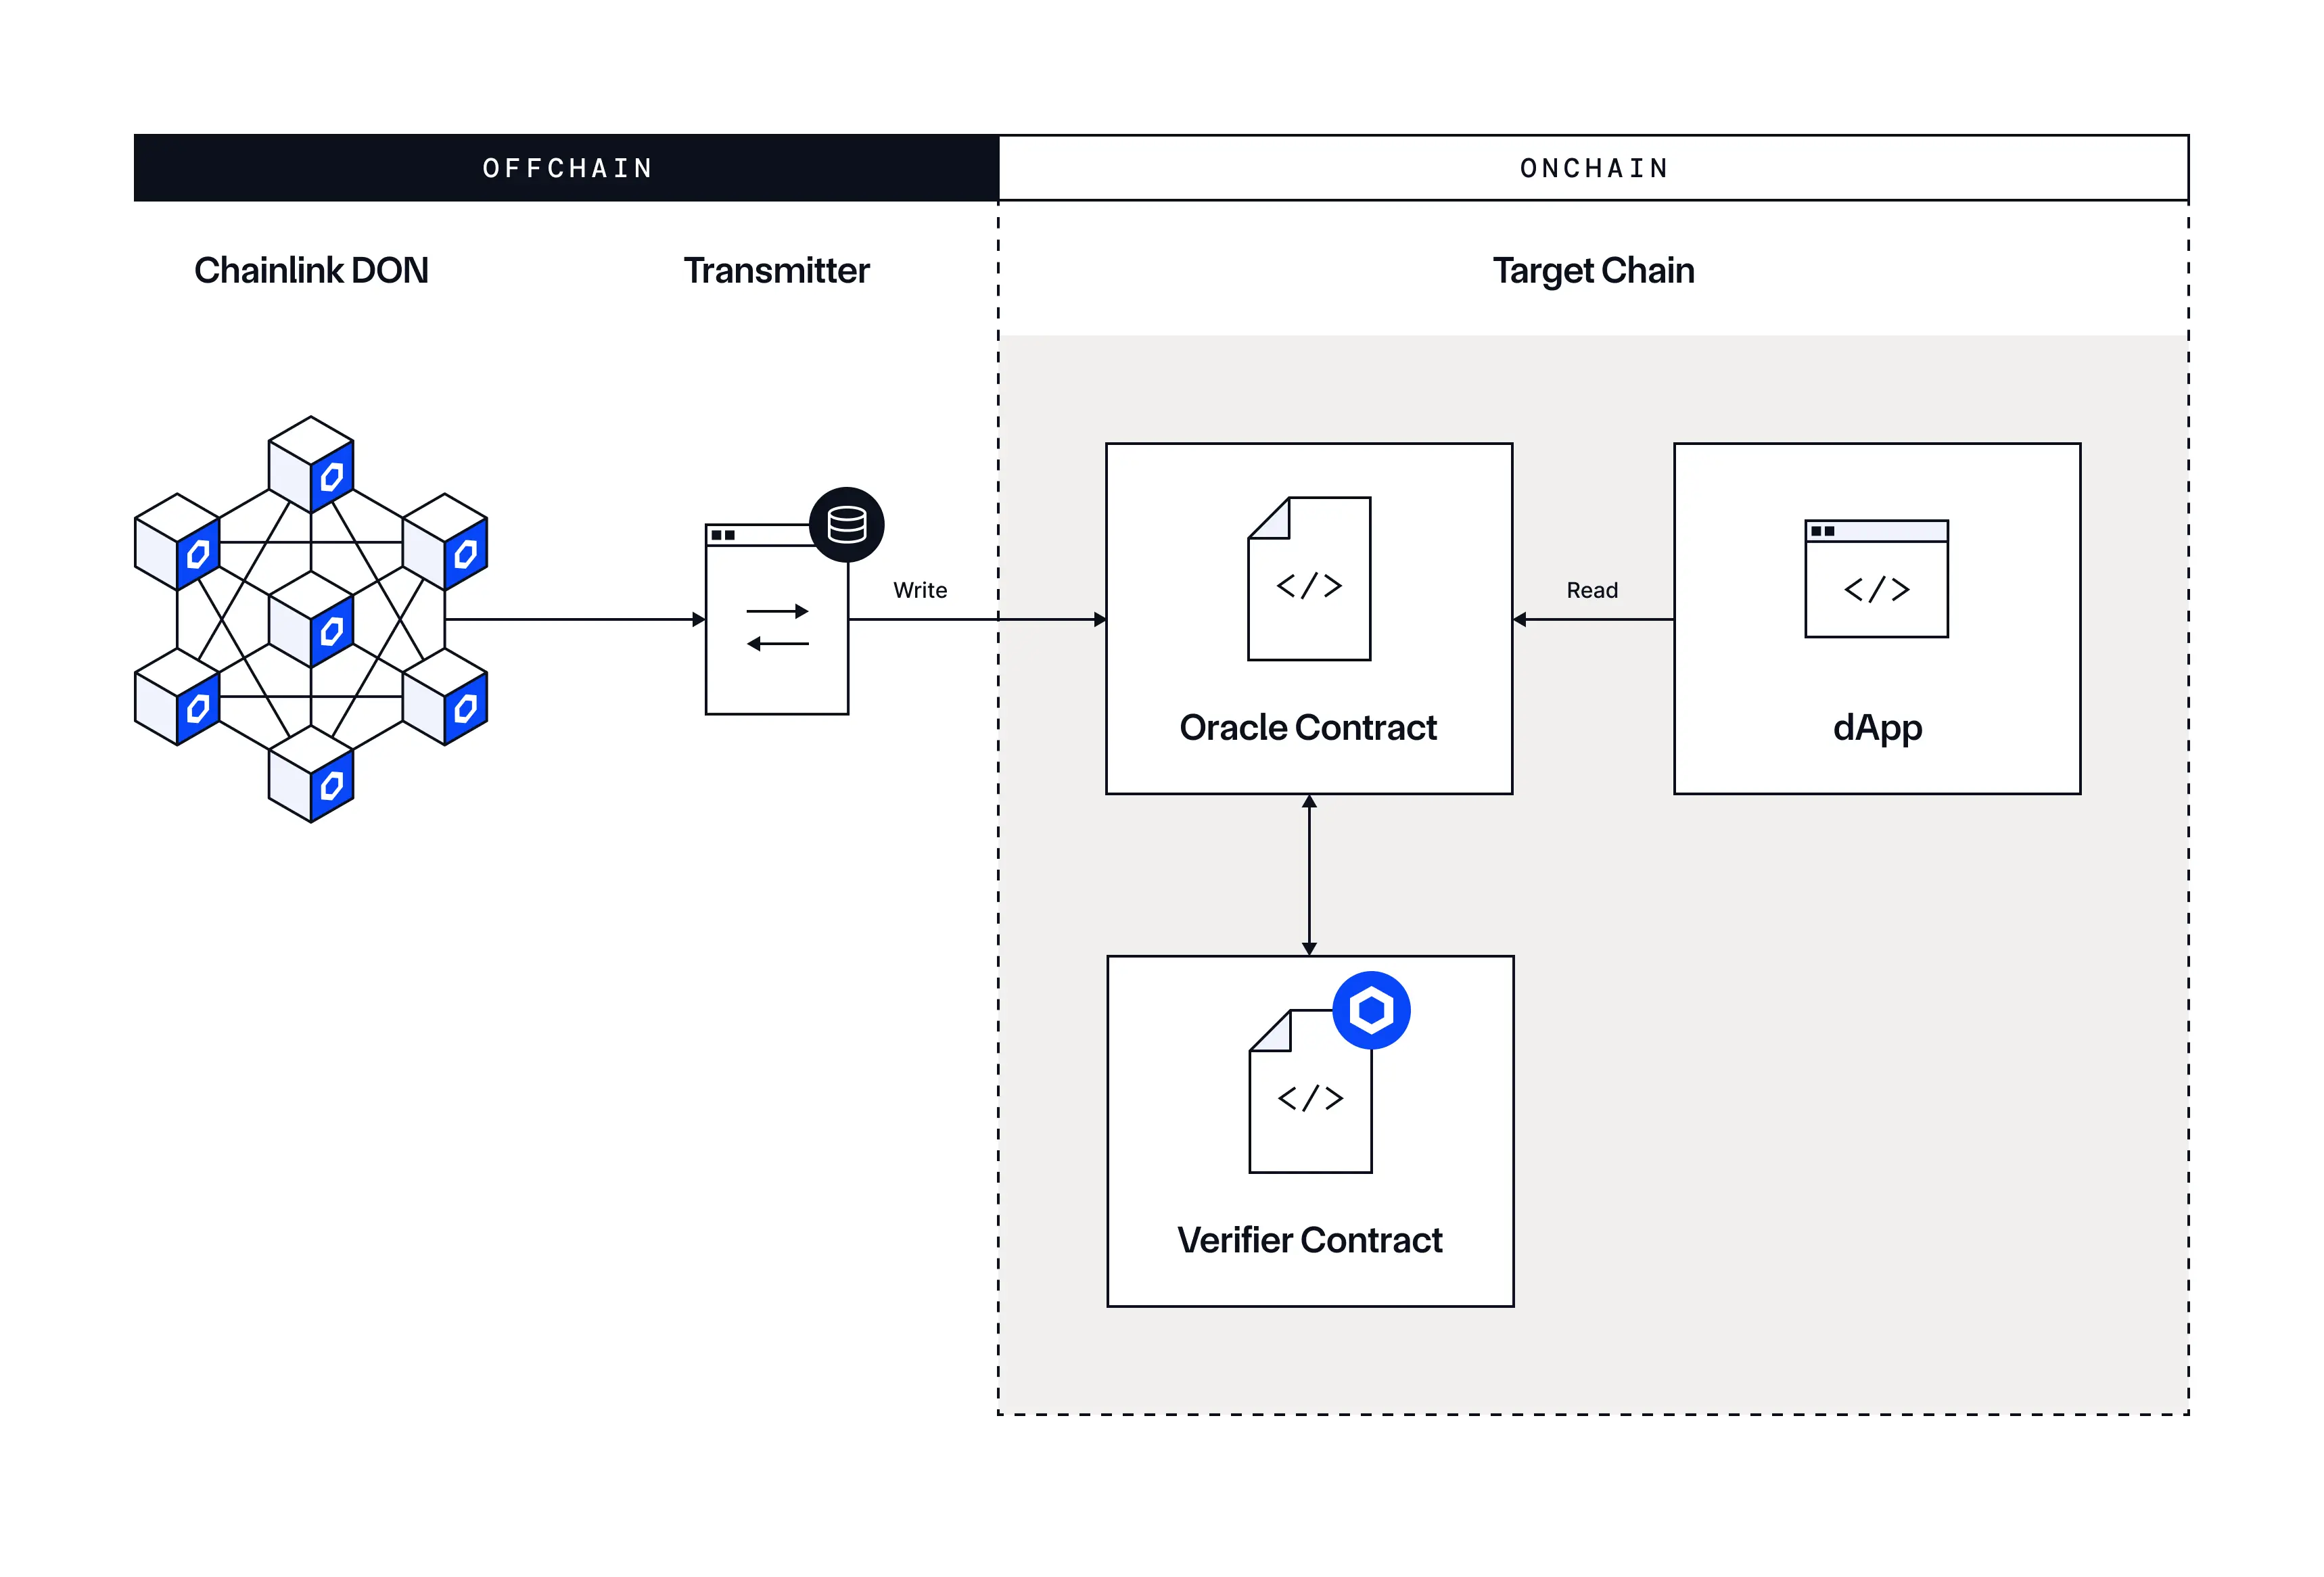
High-level Architecture
Transmitter relays data from the off-chain Chainlink network to your on-chain contracts in the following sequence:
-
Off-chain | Data Generation: A Chainlink Decentralized Oracle Network (DON) generates and signs low-latency data reports, making them available in the off-chain Data Streams Aggregation Network.
-
Off-chain | Monitoring: Transmitter, which you operate, continuously monitors this off-chain network for new reports via a WebSocket connection.
-
On-chain | Transmission: Based on your predefined conditions (such as a time interval or price deviation), Transmitter bundles the latest report into a transaction and submits it to your designated Oracle Contract.
-
On-chain | Verification: Within that single transaction, your Oracle Contract immediately calls the Chainlink Verifier Contract, which uses its
LINKallowance to submit the verification request. The Verifier authenticates the report by checking the DON's cryptographic signature. If verification fails, the entire transaction reverts, ensuring no state change occurs. -
On-chain | Consumption: Upon successful verification, the data is written to your Oracle Contract's storage. This freshly verified, low-latency data is now available on-chain for your dApp or other smart contracts to consume.
Requirements
Before you start this tutorial, ensure you have the following prerequisites:
- Deployment Host: A stable server environment (cloud or on-premise) is required for a production deployment of the Transmitter service. This guide uses your local machine for initial setup and testing.
- Software Dependencies: Foundry, Docker, Node.js, and Redis installed on your deployment host. This guide uses
pnpmfor package management. - Development Wallet: This guide requires a funded development wallet and its private key to send transactions.
- Network Configuration: This guide uses Avalanche Fuji. You can find RPC URLs on Chainlist.
- Testnet Funds: The wallet must be funded with testnet
AVAXto pay for transaction fees on the Avalanche Fuji network. TestnetLINKmust be provided to the deployed contract to pay for on-chain verification fees. Both are available from the Chainlink Faucet. - API Credentials: Access to Data Streams requires API credentials. If you haven't already, contact us to request Data Streams access.
- Web3 Foundation: A basic understanding of smart contracts and blockchain development.
Steps to Implement
1 Deploy Consumer Contract
First, deploy a DataStreamsFeed.sol contract, which receives, verifies, and stores the data relayed by the Transmitter.
-
Install Foundry, or update it to the latest version by running
foundryupin your terminal. -
Clone the
chainlink-transmitter-contractrepository and navigate into the directory:git clone https://github.com/woogieboogie-jl/chainlink-transmitter-contract.git cd chainlink-transmitter-contract -
Install the dependencies using
pnpmand install/initialize Foundry:pnpm add --save-dev @openzeppelin/contracts @chainlink/contracts && curl -L https://foundry.paradigm.xyz | bash && forge install -
Create a
.envfile in the project's root directory to store your private key, RPC URL, and link token address:cat >.env <<EOF PRIVATE_KEY="<0xYOUR_PRIVATE_KEY>" RPC_URL_AVAX_FUJI="<https://...>" LINK_TOKEN="0x5947BB275c521040051D82396192181b413227A3" EOFReplace
0xYOUR_PRIVATE_KEYwith your actual wallet private key and<https://...>with the RPC URL for the Avalanche Fuji network.The
LINK_TOKENaddress for Avalanche Fuji is0x5947BB275c521040051D82396192181b413227A3. Refer to the Chainlink documentation forLINKtoken addresses on other networks. -
Load the environment variables into your current shell session:
source .env -
Configure
script/DeployDataStreamsFeed.s.sol.This script deploys the
DataStreamsFeedcontract, which will receive data from the Transmitter.You must set the constructor arguments for the contract:
Parameter Value Description verifierProxyAddress0x2bf612C65f5a4d388E687948bb2CF842FFb8aBB3Avalanche Fuji Verifier feedId0x000359843a543ee2fe414dc14c7e7920ef10f4372990b79d6361cdc0dd1ba782ETH/USD decimals18The number of decimals for the data. description"ETH / USD Feed"A human-readable description for the feed. -
Deploy the contract via the command line.
Run the deployment script to deploy to Avalanche Fuji:
 forge script script/DeployDataStreamsFeed.s.sol:DeployDataStreamsFeed \
   --rpc-url $RPC_URL_AVAX_FUJI \
   --private-key $PRIVATE_KEY \
   --broadcast
After deployment, copy the Deployed Contract Address and ABI from the output. You will need them to configure the Transmitter.
- Contract Address: Find the contract address in your terminal output under
deployedAddress. - Contract ABI: Foundry saves the ABI in
out/DataStreamsFeed.sol/DataStreamsFeed.json.
Before we can use the Transmitter, we need to fund this contract with
LINK. - Contract Address: Find the contract address in your terminal output under
-
Fund the contract with
LINK.After deployment, transfer some testnet
LINKto the feed contract address, which allows the contract to pay for verification fees.# Example using cast to transfer 5 LINK (18 decimals) cast send $LINK_TOKEN "transfer(address,uint256)" \ <DEPLOYED_FEED_ADDRESS> 5000000000000000000 \ --rpc-url $RPC_URL_AVAX_FUJI \ --private-key $PRIVATE_KEY
2 Set Up Transmitter
With a consumer contract on-chain, you can now set up the Transmitter service to relay data to it.
-
In a new terminal window, navigate to your development space and clone the Data Stream Transmitter repository:
git clone https://github.com/hackbg/chainlink-datastreams-transmitter.git cd chainlink-datastreams-transmitter -
Install the project dependencies using
npm:npm install -
Copy the example environment file:
cp .env.example .env -
Open your
.envfile in a text editor and provide the required values:Variable Description PRIVATE_KEYThe private key of your developer wallet (ensure this is kept secure and not shared). DATASTREAMS_CLIENT_IDYour Data Streams client ID. DATASTREAMS_CLIENT_SECRETYour Data Streams client secret. -
Create the runtime configuration file by copying the example:
cp config-chainlink-example.yml config.yml -
Open
config.ymlin a text editor. Update thetargetChainssection to point to the contract you deployed on Avalanche Fuji.feeds: - name: "ETH/USD" feedId: "0x000359843a543ee2fe414dc14c7e7920ef10f4372990b79d6361cdc0dd1ba782" # --- Default Global Settings --- # The default chainId to use for transactions if not specified in a target. chainId: 43113 # Default to Avalanche Fuji # The maximum gas limit you are willing to spend on a transaction. gasCap: "250000" # Cron expression defining the data update frequency. # This example runs every 30 seconds. interval: "*/30 * * * * *" # The minimum price change percentage to trigger an on-chain update. # This example is set to 0.1% priceDeltaPercentage: 0.001 # --- Chain & Verifier Definitions --- # A list of all supported blockchain networks with their RPC URLs. chains: - id: 43113 name: "Avalanche Fuji Testnet" currencyName: "Fuji AVAX" currencySymbol: "AVAX" currencyDecimals: 18 rpc: "https://api.avax-test.network/ext/bc/C/rpc" # <-- TODO: Replace with your own reliable RPC URL testnet: true - id: 421614 name: "Arbitrum Sepolia" currencyName: "Arbitrum Sepolia Ether" currencySymbol: "ETH" currencyDecimals: 18 rpc: "https://sepolia-rollup.arbitrum.io/rpc" # <-- TODO: Replace with your own reliable RPC URL testnet: true # The addresses of the official Chainlink Verifier contracts on each network. verifierAddresses: - chainId: 43113 address: "0x2bf612C65f5a4d388E687948bb2CF842FFb8aBB3" - chainId: 421614 address: "0x2ff010DEbC1297f19579B4246cad07bd24F2488A" # --- On-Chain Target Configurations --- # This section defines which smart contracts to call for each feed on each chain. # You can have multiple targets for the same feed. targetChains: - chainId: 43113 # Target is on Avalanche Fuji targetContracts: # This configuration sends ETH/USD data to a contract on Fuji - feedId: "0x000359843a543ee2fe414dc14c7e7920ef10f4372990b79d6361cdc0dd1ba782" address: "0xYourDataStreamsFeedContractOnFuji" # <-- TODO: Update with your deployed contract address # The name of the function to call on your smart contract functionName: "verifyAndUpdateReport" # The arguments the Transmitter should prepare and send to the function # • rawReport = the unverified payload from the Data Streams websocket # • parameterPayload = abi.encode(address feeToken) – produced automatically by the transmitter functionArgs: ["rawReport", "parameterPayload"] # The ABI for the target function, required to encode the transaction abi: - name: "verifyAndUpdateReport" type: "function" stateMutability: "nonpayable" inputs: - { "internalType": "bytes", "name": "unverifiedReportData", "type": "bytes" } - { "internalType": "bytes", "name": "parameterPayload", "type": "bytes" } outputs: [] # Off-chain verification must run so keep skipVerify false (default) skipVerify: false- Replace
0xYOUR_AVALANCHE_FUJI_CONTRACT_ADDRESSwith the address of the contract you deployed in the previous step. - The
feedIdshould match the one you set in the contract deployment. - Each target block must keep
skipVerify: false,functionName: verifyAndUpdateReport, andfunctionArgs: ["rawReport", "parameterPayload"]to ensure the Transmitter correctly prepares the transaction for on-chain verification.
- Replace
-
Start the Docker daemon.
The Docker daemon is required to run the Redis instance that Transmitter uses. Starting the daemon depends on your operating system. Please refer to the Docker documentation for instructions.
-
Run the following command to start the Transmitter and its services in the background:
docker compose up -d -
Open your web browser and navigate to
http://localhost:3000to access the Transmitter UI. Because you pre-configured the contract inconfig.yml, theETH/USDstream on the dashboard should show aRunningstatus.
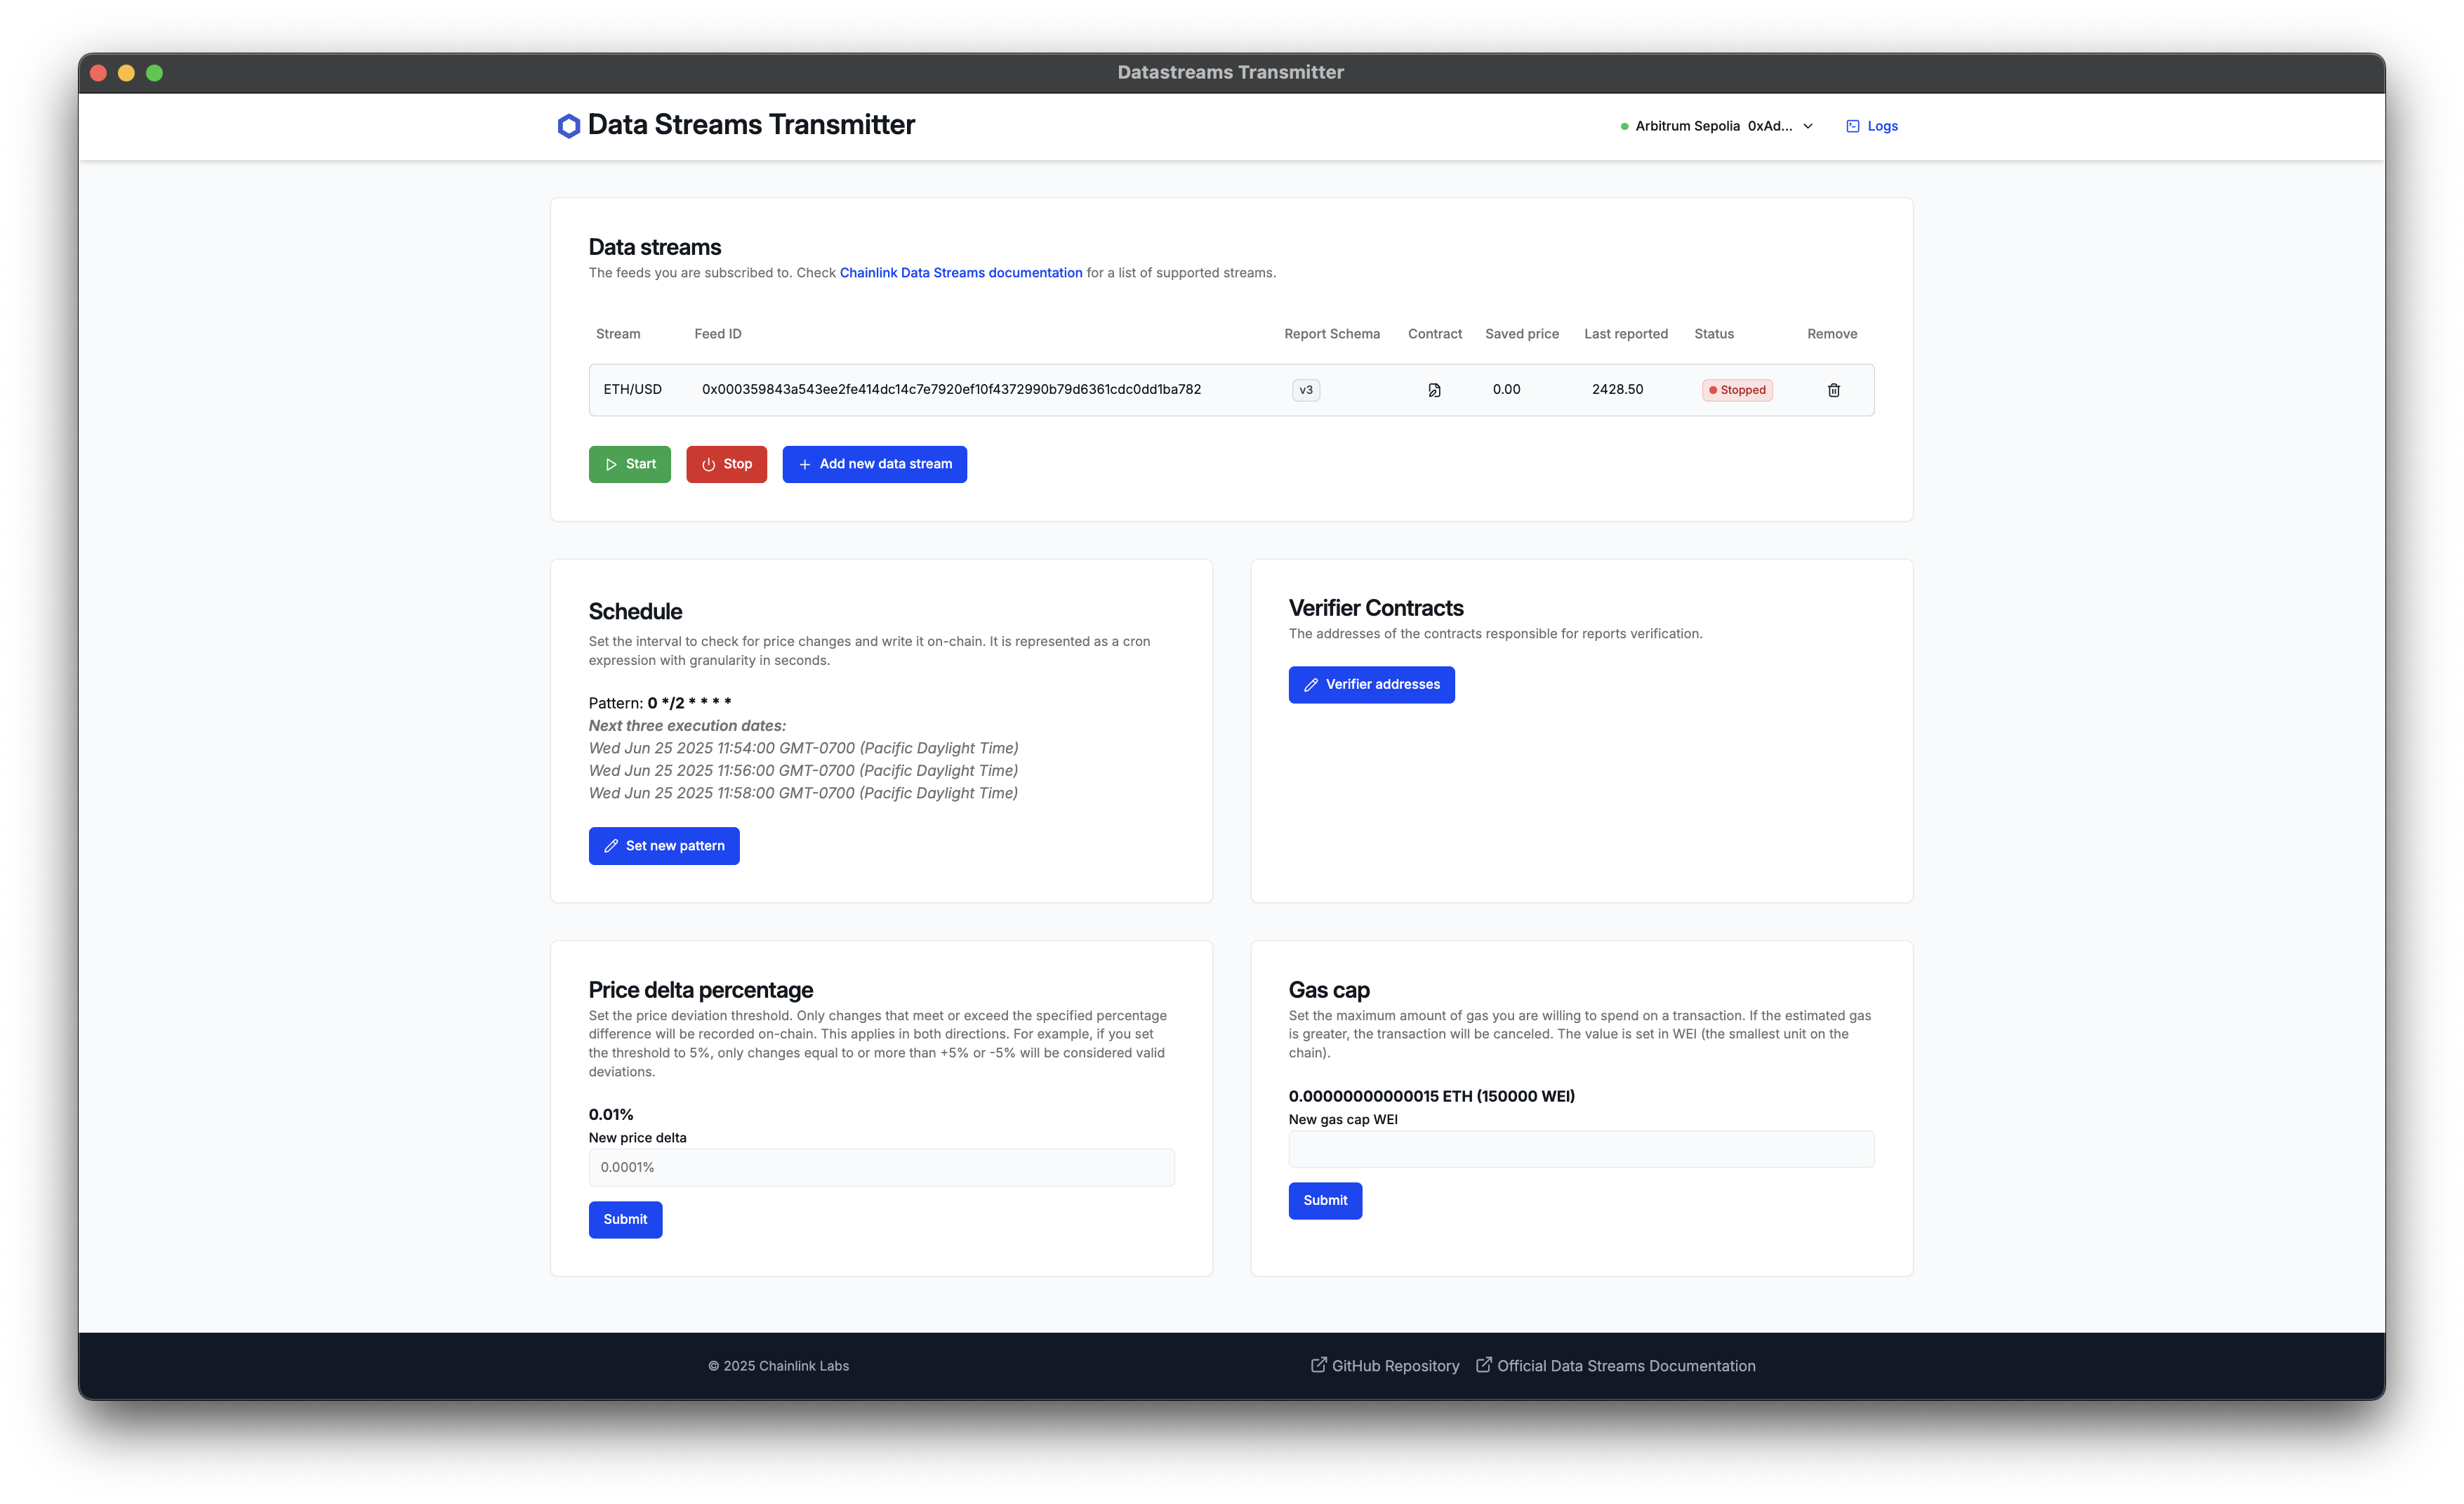
UI Overview
The Transmitter UI lets you manage your feeds, monitor their status, and define how and where data is pushed on-chain. Although we configured the basics in config.yml, you can manage the service from this dashboard.
The optional sections below provide a detailed overview of the Transmitter UI, explaining each section and its purpose.
Chain
On the upper-right corner of the page you will find the Chain section. Since the default chain is configured to Avalanche Fuji, you should see that network listed along with details for your wallet.
| Field | Description |
|---|---|
| Current Chain | The current chain, which is where data will be pushed. |
| Chain ID | The unique numeric identifier for the current chain. |
| Wallet Address | Your unique wallet address. |
| Native Token Balance | Your native token balance, which is used to pay for on-chain transaction fees (gas). |
| LINK Balance | Your LINK token balance, used to pay for Chainlink Data Streams transactions. |
Your balance should reflect the amount of testnet LINK and AVAX you have in your wallet. If you need more, you can use the Chainlink Faucet.
Logs
On the top-right corner of the page, you will find the Logs section, which contains details for all Transmitter actions. When operating correctly, the log should reflect a clear, step-by-step process for each on-chain update.
Example log output:
[2025-07-01 16:48:44] info: 🩺 Health check endpoint running at http://localhost:8081/ready
[2025-07-01 16:48:44] info: 🚀 running at http://localhost:3000
[2025-07-01 16:48:44] warn: ℹ️ App already configured
[2025-07-01 16:48:44] info: 🏁 Streams have been started
[2025-07-01 16:50:00] info: 🚨 Price deviation detected | ETH/USD: 3450.06$ | 📉 -0.2135% (-7.36$)
[2025-07-01 16:50:00] info: 📆 Scheduled for writing onchain
[2025-07-01 16:50:00] info: ⛽️ Estimated fee: 0.024395523392104215 LINK # This fee is deducted from the contract's LINK allowance, NOT the sender's balance
[2025-07-01 16:50:04] info: ✅ Report verified
[2025-07-01 16:50:06] info: 📝 Prepared verification transaction
[2025-07-01 16:50:07] info: ⌛️ Sending transaction 0xa59aa3e9c7a2cd020d79bd73e6c7f1aca9a576b77edb43ee35180001709fdf43
[2025-07-01 16:50:08] info: ℹ️ Transaction status: success
[2025-07-01 16:50:08] info: 💾 Price stored | ETH/USD: 3450.06$
Data Streams
The Data Streams section lists all Data Streams, their status, and any related contracts. You should see the ETH/USD feed listed here, which was set in the config.yml file.
| Field | Description |
|---|---|
| Stream | The name of the stream. This is the name set by the user for easier tracking and feed identification. |
| Feed ID | The feed ID. Check Chainlink Data Streams Documentation for a list of supported streams. |
| Contract | Target contract for the feed on the current chain. Click to open a configuration page where you can define the target contract, functions, and ABI. |
| Saved price | The latest price recorded on-chain. |
| Last reported | The latest price reported by the stream. |
| Status | Current status of the stream. Possible states include: Running, Connecting, Stopping or Stopped. |
| Remove | Click to remove the stream. |
Schedule
The Schedule section allows you to define how often the Transmitter should push data on-chain, using a cron expression. We have already defined this in the config.yml file, but you can change it here.
Verifier Contracts
The Verifier Contracts section lets you specify contracts that will verify the data being pushed on-chain. The verifier contract for your current network will be automatically selected based on config.yml.
Price Delta
The Price Delta section lets you define the price change threshold that will trigger an on-chain update. We set this in the config.yml file, but you can change this value here.
Gas Cap
The Gas Cap section lets you set the maximum gas limit for transactions. We set this in the config.yml file, but you can change it here.
Troubleshooting
If you run into issues during setup or operation, refer to these common problems and their solutions.
Transmitter Service Issues
-
Service fails to start or crashes immediately
- Double-check that your
chainlink-datastreams-transmitter/.envfile is present and correctly populated with yourPRIVATE_KEYand Data Streams credentials. - Run
docker compose logs -fin thechainlink-datastreams-transmitterdirectory to view real-time logs and identify specific error messages.
- Double-check that your
-
Data is not updating on your contract
- Review the logs in Transmitter for specific error messages related to the feed or contract interaction.
- Authentication: Verify that your
DATASTREAMS_CLIENT_IDandDATASTREAMS_CLIENT_SECRETare correct and do not have extra spaces or characters. - LINK Balance: Ensure the contract holds sufficient
LINKbalance to pay for on-chain verification fees. Top up the contract if needed -- testnetLINKcan be found at the Chainlink Faucet. - RPC Endpoint: Confirm the RPC URL in your
config.ymlis correct and the node is reachable.
Contract Deployment & On-Chain Errors
-
Gas estimation too higherror- When deploying with Foundry, you can adjust the
gas_limitin yourfoundry.tomlfile. - For the transmitter, you can increase the
gasCapvalue in yourconfig.ymlfile. You can also update it in the Transmitter UI under the Gas Cap section.
- When deploying with Foundry, you can adjust the
-
Missing private key
forge scriptwill silently fall back to Foundry's default dev key and assign contract roles to0x1804c8AB1F12E6bbf3894d4083f33e07309d1f38.- Always pass your key via
--private-keyor export it in.env/shell.
Conclusion
Congratulations! 🎉 You have successfully deployed a DataStreamsFeed contract, set up the Data Streams Transmitter, and linked them together.
You can now monitor off-chain Data Streams and push updates to your smart contracts without writing any code or managing your own backend infrastructure. The Transmitter handles all the complexity of connecting to Data Streams, monitoring data changes, and pushing updates on-chain.
For more advanced usage, troubleshooting, or to contribute, visit the GitHub repository or check out the official Data Streams documentation.
Happy building!